
I've never been much of a joiner. I'm not antisocial; I just prefer the solitary heaven of my studio. But for the last four years or so, I've had the great pleasure of finding a wealth of like-minded folks with whom to share a variety of forms of creative madness. My Story Circle Network chapter, Wordweavers; a writing/critique group we just call the BGs; and, most recently, an on-line group called Artdollz have enriched my life, creative and otherwise, in so many ways. All of them serve to lure, push, cajole, and drag me out of the various boxes I find myself in.
Some of the things I have most enjoyed about Artdollz in the short time I've been a member are the challenges, round robins, and doll swaps members may participate in throughout the year. These are usually a set of loose parameters and a deadline intended to stimulate us to do something we might not do otherwise and to try out new materials and techniques. I just finished and shipped off my first swap doll, and now I'm eagerly waiting to see what cool doll I'll get back in return, and from whom.
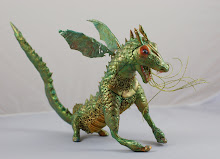
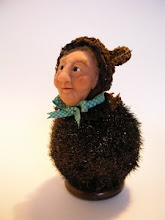
This swap had several requirements. The doll had to be flat-backed so that it could hang on a wall, but it should be three dimensional. It should depict something mythological, either classical, fictional, or from the artist's own mythology. And it had to incorporate a material called Tyvek, which does interesting things when it's heated. You're all probably familiar with Tyvek, even though you may not know it; it's that papery waterproof material that some Fed Ex envelopes and light jackets are made from. I didn't know the material by name, but it had always intrigued me. After a few hints from Artdollz members, I was off. I thought about several possible subjects for this challenge, but I kept coming back to a punk doll I had made at least a decade ago, but was never satisfied with. I played with the Tyvek by ironing it inside a folded Teflon sheet, and as the material morphed, I started to see what I wanted to do with it.
First I disassembled the old doll and trimmed the head off just at the shoulders. I'm posting the technical processes and materials below for anyone who's interested. For those of you who are not, I'll just cut to the chase here. What popped into my mind was a punk merman, with a black/gray color scheme, a neon mohawk "fin" on his head, a ripped shirt, and a tail with chains. I decided to call him Liverpool Merman as a tribute to the British punk scene and because of the play on the word pool where he might hang out. I'm now totally in love with Tyvek and have a head full of ideas about what I'd like to do with it next. I also really liked the way the merman turned out. I hope that whoever gets him in the swap will feel the same.
PROCESS/MATERIALS
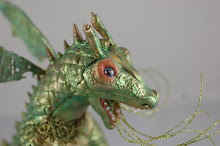
The punk bust is Super Sculpey, if I remember correctly. The eyes are painted pin heads, the nose pierce is a cut-off steel dressmaker's pin, and all the other piercings are wire twists inserted into the polymer before curing. The collar is black Fimo with pin heads (like the nose stud), built onto the neck before curing. I secured the bust through the wooden base with Crafter's Choice glue and a regular metal screw through a drilled hole.
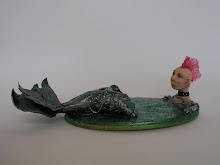
The "water" is Tyvek lightly ironed inside a Teflon sheet so the wrinkles are minimal and then painted with Lumiere. I also sprinkled it while wet with some Pearl-X powder and crystal glitter and then muddled everything a bit to simulate water surface and sunlight. I used Sculpey matte glaze as a seal after the paint was dry.
The tail is Creative Paperclay over wire mesh to hold the shape. When the paperclay was dry, I glued more severely distressed, puffy Tyvek around the tail and fin and painted it with Lumiere. The hip wrap is a separate piece of Tyvek, again glued to the form and painted, and "closed" with purchased dyed shells and silver chain. I used more of the same shells hot-glued to the wooden base to brace the doll's neck and ground the upper portion of the piece and to provide some texture to balance the highly-textured tail portion. I added just a bit of drybrushed Lumiere paint (in a couple of coordinating colors) to integrate the colors of the dyed shells into the overall design. In order to assemble the piece, I allowed for the wire mesh to extend a bit beyond the paperclay part of the tail that would show and slipped that through a slit in the "water," with everything (tail and water) securely held in place with Crafter's Choice glue.
The mohawk fin is also Tyvek, subjected to very high heat and severely distressed. It's translucent and very porous, like fan coral. I glued the fin to the doll's head and then used gel medium with fiber to form the doll's original "hair" mohawk into coral-like branches or strands that I gelled to the fin. When the gel medium was dry, I painted the fin with very diluted Lumiere, almost like an ink wash, and added some wash to the tail fin as well, to carry the pink color throughout the doll.
This guy can hang on the wall by his punk safety pin hanger, but he prefers to sit on a table or shelf.
Subscribe to:
Post Comments (Atom)


3 comments:
Mmmmm...Tyvek, what an idea! Got to wondering if I could incorporate it in felt-making, googled, and found several intriguing things. Thanks for showing us how this works! Great doll, too! I love the way you recycle stuff, Theresa--things you've made, stuff from your stash, stuff from your life. So creative.
I have two comments:
I like your merman dude.
and
I like your merman, dude.
NLB
Wicked Cool!
Love it, LI
http://artdolladventures.blogspot.com/
Post a Comment